Blog

How to Use Plastic Filler Compound for Perfect Repairs?

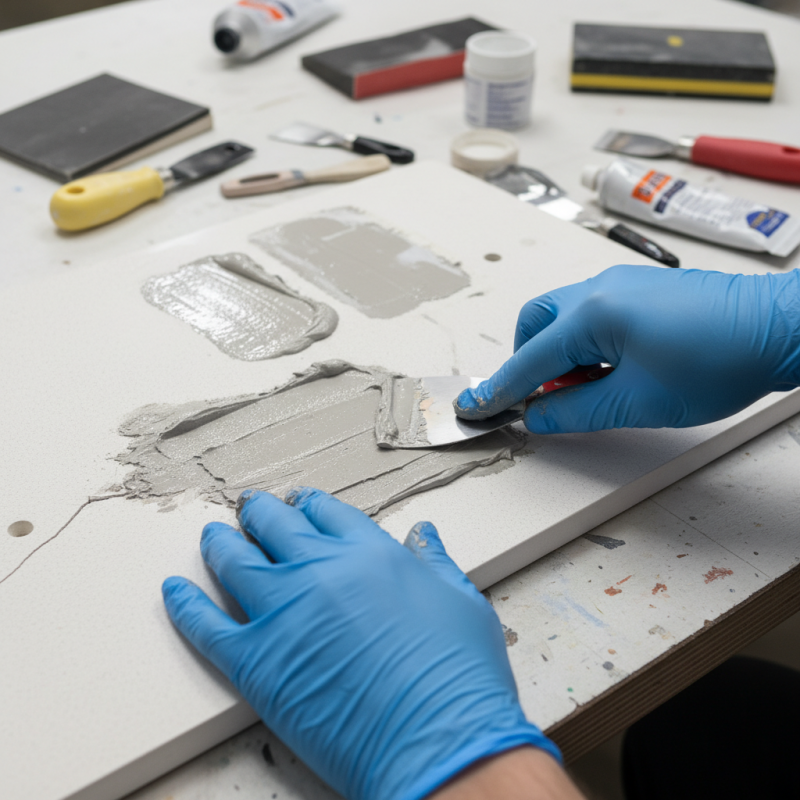
Repairing surfaces effectively is vital. Using a plastic filler compound can help achieve seamless results. This compound works well with various materials, from wood to metal. It fills imperfections and creates a smooth finish.

To begin, understanding the product is essential. Plastic filler compound comes in various types, each suited for different tasks. Choosing the right one can be challenging. Sometimes, even professionals make mistakes. Misjudging the quantity or type could lead to unsatisfactory repairs.

Application requires practice. Even with perfect products, technique matters. Be cautious with application. Too much filler can create uneven surfaces. Remember, even small missteps can disrupt your efforts. Learning from these moments is key to mastering repairs. With each attempt, your skills will improve.

How to Use Plastic Filler Compound for Perfect Repairs?

What is Plastic Filler Compound and Its Uses?

How to Use Plastic Filler Compound for Perfect Repairs?

Plastic filler compound is a versatile material often used in repairs and restorations. It consists of a polymer base, which enhances its adhesion and flexibility. Many people utilize it to fix cracks, dents, or even gaps in materials like wood and metal. It can also be painted over, making it ideal for both small and large projects.

When applying plastic filler, preparation is crucial. Make sure the surface is clean and dry. Applying too much filler may lead to an uneven finish. It's easy to overestimate the amount needed. Many have faced this challenge, resulting in further sanding and reshaping. A thin layer often works better than a thick one. Patience is vital when smoothing out the surface for a seamless look.

Curing time is another factor to consider. Many rush the process, leading to cracks upon drying. Taking time to let the filler set properly ensures durability. Still, reflect on how you can improve your technique. Each repair presents a learning opportunity. Don't feel discouraged by imperfections; they guide better future attempts.

Choosing the Right Type of Plastic Filler Compound for Your Project

When choosing the right type of plastic filler compound for your project, consider the material you will be repairing. Different plastics require specific fillers. For instance, use a flexible filler for items that experience movement. Rigid fillers are great for hard surfaces. Always read labels carefully to ensure compatibility.

Tips: Test a small area before committing to a larger project. This will help you gauge adhesion and color match. An imperfect match can lead to visible repairs. If your project involves automotive parts, look for fillers designed specifically for that purpose. They often withstand higher stress and weather conditions.

Research suggests that your application technique matters as much as the filler type. Apply the compound evenly, avoiding thick layers. If not, it can crack or peel. Remember to sand the area once dry for a smooth finish. Sometimes, the imperfections reveal the story behind the repair. Embrace them, and learn from each project.

Step-by-Step Guide to Preparing the Surface for Repair

Preparing the surface is crucial for a successful repair with plastic filler compound. A clean and smooth surface allows the filler to bond effectively. According to industry reports, nearly 30% of repair failures can be traced back to inadequate surface preparation. Begin by cleaning the area with soapy water. Remove all dust, grease, and old materials.

After cleaning, inspect the surface. Look for cracks or imperfections. Use sandpaper to smooth rough edges. Sanding not only helps with adhesion but also provides a proper texture for the filler. Data shows that a well-prepped surface can increase the strength of the repair by 50%. Be mindful not to over-sand; it could create more problems than it solves.

Next, consider the environment. High humidity or extreme temperatures may affect the curing process. Ideally, repairs should be made in controlled conditions. Some workers overlook this, leading to subpar results. This oversight can be detrimental, as it impacts how the filler sets and dries. Pay attention to these details for a more reliable repair.

How to Use Plastic Filler Compound for Perfect Repairs? - Step-by-Step Guide to Preparing the Surface for Repair

Step Description Materials Needed Estimated Time
1 Clean the surface by removing dirt, dust, and grease. Cleaning solution, rag 15 minutes
2 Sand the area to create a rough surface for better adhesion. Sandpaper (80-120 grit) 20 minutes
3 Apply the plastic filler compound according to the manufacturer's instructions. Plastic filler compound, putty knife 30 minutes
4 Allow the filler to dry completely. N/A 1-2 hours
5 Sand the filled area to ensure it is smooth and level with the surface. Sandpaper (120-220 grit) 20 minutes
6 Clean again to remove dust and prepare for painting or finishing. Cleaning solution, rag 10 minutes
7 Paint or finish the repaired area to match the surrounding surface. Paint or finishing material 30 minutes

Applying the Plastic Filler Compound: Techniques for a Smooth Finish

Applying plastic filler compound effectively requires careful attention to detail. Start by preparing the surface thoroughly. Clean away dirt and debris, ensuring a smooth application area. Studies show that a well-prepared surface can improve adhesion by up to 50%. Many ignore this step, leading to poor results that necessitate additional work.

When mixing the filler, follow the guidelines closely. A precise ratio is crucial for the compound to cure correctly. Use a small mixing paddle for consistency. Often, users rush this part, resulting in rough finishes. Apply the filler smoothly with a putty knife. It's essential to work in thin layers and avoid overworking the compound. Ideally, each layer should not exceed 1/8 inch. Patience is key; rushed applications can lead to cracking.

After applying the filler, let it cure completely before sanding. This step is vital for achieving a flawless surface. Use fine-grit sandpaper for a smooth finish. Many forget to check for imperfections post-sanding. A careful inspection reveals areas that may need touch-ups. In fact, around 30% of amateur repairs fail at this stage. Taking the time to revisit these details elevates the overall quality of the repair, ensuring a long-lasting result.

Finishing Touches: Sanding and Painting after the Repair

After applying the plastic filler compound, it's essential to focus on sanding and painting. Begin sanding once the filler dries completely. Use a fine-grit sandpaper for a smooth finish. Start with light pressure. Move in circular motions to avoid flat spots. Mistakes happen; some areas may remain uneven and need more filler.


Once satisfied with the sanding, prepare for painting. Choose a suitable primer that adheres well to the filler. Apply it thinly, using a brush or spray, to avoid drips. Let it dry before moving on. The paint color should match the surrounding area. A test patch can help gauge the match. If the color is off, contemplate mixing shades for better harmony.


Painting requires patience. Apply several thin coats rather than one thick layer. This approach prevents runs and shows better results. After each coat, check for imperfections. You might find spots needing touch-ups. These small flaws can be frustrating but are part of the learning process. Embrace the imperfections as they can lead to improvement in your skills.

Register now